The sun warms the earth everyday for free. With simple materials and skills we can concentrate, store, and transfer this heat for a variety of uses: home heating, cooking, drying, heating water, growing food. The basic design principles are very simple and flexible. Using this resource causes minimal environmental impact. This site offers some helpful resources for you in the form of references, basic plans and instructions, and workshop offerings. Feel free to contact us for help or clarification.
PASSIVE SOLAR 101
The passive solar devices we will discuss all use one simple design: an insulated box that collects heat from sunlight through a clear glass lid. The infrared radiation in sunlight is mostly a wavelength that passes through glass and some clear plastics with little absorption. When the infrared is absorbed by the materials inside the box, house or greenhouse, it is re-radiated at a slightly different infrared wavelength that does not pass through the glass, thus trapping the heat inside. The temperature achieved inside the box is a function of the intensity of the sunlight, the angle of the light to the glass, the length of time exposed to the light, the size of the collecting glass relative to the volume of the box, the thermal inertia of the box and its contents, and the insulation of the box. Temperature can be regulated by blocking different amounts of the glass or by venting the box. Understanding these few principles will allow you to design a passive solar device to fit your needs with the materials you have available. See the list of suggested references for more details.
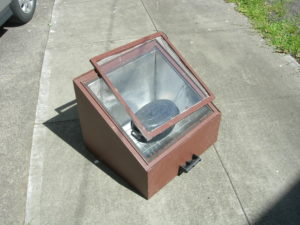
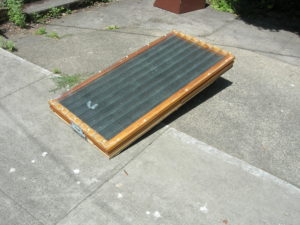
Solar ovens are built all over the world from local materials. They range from highly sophisticated manufactured units to very simple handmade units. There are two basic types, the reflector oven and the box oven. We will be discussing the box oven here, but see the suggested references for other design types. A very simple design could be a box consisting of a ring of earth like a large doughnut sitting on the ground, a rubber innertube, or a corrugated cardboard box. The lid could be any clear glass or plastic that traps infrared and will withstand high temperatures. Efficiency can be improved most easily by increasing the size of the glass relative to the volume of the box, and by increasing the insulation value of the walls of the box. The ability to tilt the box so that the sunlight strikes the glass as close to a right angle as possible will also increase efficiency. The design presented below can be made from basic salvage materials using simple woodworking skills and tools. It is durable, portable, and capable of temperatures that will bake bread. The instructions below include photographs of the finished oven, detailed plans, a description of building the oven, and directions for cooking with the oven. If you have any questions, feel free to contact us. We also offer workshops for small groups that allow you to build your own oven. Contact us if you are interested in setting up one of these workshops for your friends or organization.
ASSEMBLY INSTRUCTIONS FOR SOLAR OVEN
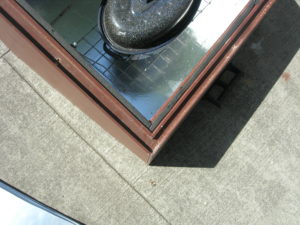
The 5 panels of the solar oven box are constructed of 3/4 inch by 1 1/2 inch wood strips and quarter inch thick plywood skins. The strips are nailed together into frames as shown in the plan drawings. Then a piece of 1/4 inch plywood is glued and nailed to the inside of the frame. This plywood will be exactly the same size as the wood frame. Fill the cavity of the frame with insulation. Good insulation includes fiberglass batt insulation and corrugated cardboard. Whatever you choose, make sure it is not toxic, will withstand several hundred degree temperatures, and will not shift and settle. When the insulation is installed, glue and nail the 1/4 inch plywood on the outside of the frame. Some of these pieces of plywood will extend beyond the frame as flanges to fasten the panels together. The plywood needs to be fastened on squarely and with the correct overhangs so the panels will fit together snugly. The flanges are 1 7/8 inches wide, so wood blocks or strips cut to this width can be used as guages on each side to set the plywood squarely. Taking the time to do this step properly is crucial to the function of the oven.
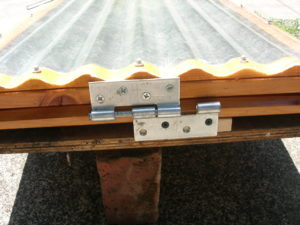
Fasten the bottom flange of the side panels to the bottom panel with glue and screws. Make sure all panels fit together tightly before fastening. Predrill holes for screws in the plywood. 4 screws on each flange should be sufficient. Fasten the front and back panels to the bottom and side panels. Nail the 3/8 by 3/8 inch strips around the top ledge of the box as shown, leaving the correct spacing for the glass panel.
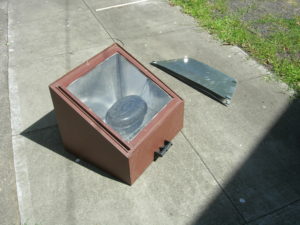
Now make the glass panel. Rip the groove in the wood frame strips so that your glass thickness fits easily. Be sure there is at least 1/16 inch clearance around all the glass edges for expansion. Clear single pane 1/8 thick glass is best. Thicker glass or double pane glass will decrease the efficiency. Pre-drill and counter sink the holes for the screws that fasten the frame together. Make sure you don’t touch the glass with screws. Don’t split the wood by overtightening screws. Drill holes for a simple screw or knob handle in opposite sides of the frame, missing the glass.
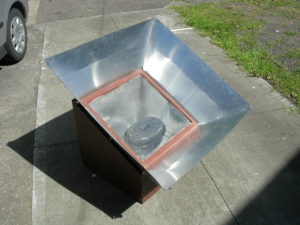
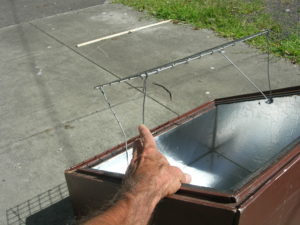
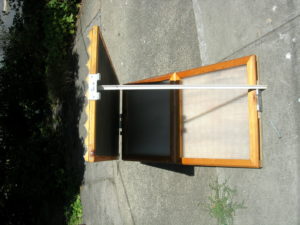
The reflector is a crucial part of the oven. It greatly increases the amount of sunlight entering the box. The angle is calculated to minimize reflection off the glass. Cut the 4 pieces of the reflector from 12″ shiny aluminum flashing as shown in the plans. Bend a slight crease across most of the length of each piece as shown to stiffen the aluminum. Mark the hinge line 3/8 ” in from the inside line of the tabs on each piece. Cut out the spaces between the hinge tabs as shown using tin snips and a knife. Place a 1/8 ” straight rod or steel plate edge just to the inside of the hinge line and bend the hinge tabs all in one straight line. Slide in a bicycle spoke of the correct length (from a 27 inch wheel) and crimp down the hinge tabs slightly around the spoke with pliers. To assemble, slide a spoke from the top down into the hinges from each adjoining side of the reflector. Thread the spoke nut on the bottom end of each spoke and crimp the bottom edge of the hinge flange lightly around the nut. You should be able to fold the reflector flat to the size of one side panel for transport and storage.
Caulk all exposed joints and corners on the inside and outside of the box. Use non-toxic caulk, paints, and sealants. The outside, top ledge, and glass frame should get a durable waterproof finish. Paint the inside bottom of the box with flat black exterior latex house paint. The inside sides of the box should be reflective. You can use white or reflective paint, or glue aluminum foil to the plywood with diluted white school glue.
Some modifications you can make:
Attach lifting handles to the outside of the oven.
Attach rubber feet to keep the bottom off the ground.
Put a flat black ribbed aluminum soffit panel in the bottom of the box to circulate heat under the pot. Best of all is to install a swinging wire pot rack suspended from bolts on the inside sides of the box that will keep the pot level when you tip it for optimum sun angle.
Foam weatherstripping on the top ledge of the box to seal against the glass panel frame.
Holes in the bottom edge of the reflector and top plywood flange of the box to accept wires or screws to hold the reflector to the box if there is wind.
Use flat black metal pots or oven proof glass pots with tight lids for maximum efficiency. Large shallow pots absorb heat faster than deeper larger pots.
USING YOUR OVEN
Using solar ovens effectively may require changing some habits and attitudes we’ve picked up from years of concentrated power at the push of a button. Ovbiously , the sun has to be out, but several factors will affect how hot your oven actually gets. Keep reflectors and glass clean. Avoid setting the oven in cold or windy spots. A protected spot next to a south facing wall is ideal. Your oven will not work well inside a window, since every pane of glass causes a 15% loss of sunlight. The colder the air temperature the colder it will be in your oven. The larger the amount of food and the lower its initial temperature, the longer it will take to cook. Cut food into small pieces and cover with a minimal amount of water when boiling. The more surface area your container has the faster it will absorb heat. Shallow or multiple containers are better than one large round container. Use oven proof glass or thin metal pots with tight fitting lids. Flat black exteriors on pots will heat faster than shiny ones. Any haze or clouds will decrease the available heat. Maximum heat gain occurs when the light hits the glass at a 90 degree angle. Its best to keep turning the oven to face the sun every hour if possible. Best cooking times are when the sun is highest, from about 10 am to 2 pm.
For foods that have a definite cooking time, you will have to monitor progress because of all the variables. Sometimes you may have to finish cooking on an alternative heat source if cooking is too slow or interrupted. Avoid opening the oven any more than necessary due to the loss of heat. Foods that are easy to cook include rice, beans, soup, stews, chili, steamed veggies, pot roasts, and similar dishes. It is possible to bake under optimum conditions, but there is minimal browning and the results may differ from what you are used to. See the suggested reference list for recipes, cooking tips, and more info.

SOLAR FOOD DRYER
I This solar food dryer may seem complicated compared to just setting food out in the sun to dry, but it is relatively simple to build and has many adavantages. It protects the food from the direct sun, thus reducing the loss of nutrients to degradation from ultraviolet energy. It protects the food from wind and rain, allowing you to leave it unwatched for days at a time. It protects food from disturbance and contamination by insects and other animals. Finally, it actually dries food faster than just setting it out in direct sun. This is because the device creates a continuous flow of air that draws off the moisture as it evaporates. The dryer can be made any size and can be constructed of used materials. It is very durable, and will last a lifetime.
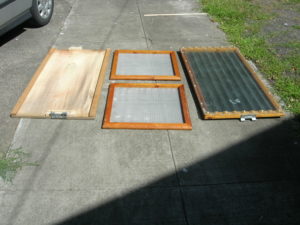
Refer to the drawings in the PDF and the pictures below as you read these instructions. The dryer has three components: a weatherproof base that can be left outside permanently, drying screens, and a cover panel that protects the food and dries it with radiant heat. The base is best made out of old galvanized metal barn roofing. This is usually readily available if you ask around at local farms. It can be full of holes and dents, so discarded used roofing works fine. Alternativel you can make the base from wood. The base must support the other components and allow for air movement under the food screens. The ridges in the barn roofing provide this circulation, but this could also be achieved with slats or plywood with strips that raise the screens above the plywood. A frame for the permanent base can be made from used lumber. This frame should support the weight of the other components and be tilted towards the South at about 15 degrees to get more direct sun without causing food to slide down the screens. Components in this plan are based on 2 foot square food screens, but any size can be used. These components are unitized into 2 foot square screens covered by 2 ‘ by 4′ cover panels, arrayed on a base that is 4′ tall and long enough for the number of covers and screens you have. For example, if you make 8 screens and 4 covers your base would be 4′ by 8’ .
The screens are wood frames with non-toxic screen stapled to the underside with wood strips. You can purchase special non-toxic food screens from companies that manufacture food dryers. You can also use fiberglass, aluminum, and copper screen, though each of these has some slight potential to contaminate food under certain conditions. For the most part, these materials are just fine for this purpose. If you want you can reinforce the screen with 1/2 inch hardware cloth fastened underneath the screen. The wood frames should be at least 1 inch thick to allow for bulkier food items. If you apply a weather proof finish to the wood make sure it is non-toxic.
The cover panels collect the heat from the sun and convert it into radiant heat. A wood frame is covered with transparent material on the top and metal painted flat black on the bottom. Transclucent fiberglass skylite panels made for barn roofs can usually be found used. These should be in good condition, without large holes or damage. Small holes can be patched. These panels are predrilled and screwed to the frame, using scalloped spacers on the end that fit the corrugations in the panel. These spacers can be recycled or purchased new at a building supply store. The metal can be aluminum or steel flashing or any thin sheet metal painted flat black on both sides. Seal the metal and clear panel to the frame with silicaone caulk. This will help the heat build up inside the panel. Some kind of stops are necessary on the bottom side of the frame to keep everything from sliding off. If you use door hinges as shown, these can be used to fasten all the components to the frame so they are not blown off or dislodged by animals. The hinge pins are easy to remove while you are loading and unloading the dryer. You can use a piece of stiff wire bent to fit into the hinges to prop up the cover panels while loading and unloading the dryer.
Once the sun heats up the cover panel, the black metal gets quite hot and dries the food below. The ridges in the barn metal underneath direct the heated air into a steady upward flow under the screens that draws the heated air through the food and draws off the evaporated moisture. This can actually make the food dry faster than if it is just sitting in the sun. This device is a marvelous example of using simple design and recycled materials in a passive solar design to dry food more efficiently and conveniently.
SELECTED REFERENCES
BOOKS
Lorraine Anderson, Cooking with Sunshine
Dan Halacy, Cooking with The Sun
Lee Elliot, Solar Cooking
Joseph Radabaugh, Heavens Flame
Solar Cookers International, Solar Cookers
Eben Fodor, Solar Food Dryer
Ray Wolf, Solar Food Dryer
Stella Andrassy, Solar Food Dryer Book
ONLINE RESOURCES
journeytoforever.org
solarcookers.org
solarcooking.org